0%

禁止ota升级

1
2
3
4
5
6
7
8
9
10
11
12
13
14
15
16
First of all, the device needs to be jail broken.
1. ssh to the device through either wifi or usbnet. I do not see a difference here.
2. mntroot rw
3. cd /usr/bin
4. mv otaupd otaupd.bck
5. mv otav3 otav3.bck
6. ps aux | grep ota
You will see four processes here. Ignore the "/usr/java/bin/cvm" and "grep ota".
The second column is the process id, note down the ids of the other two processes, otav3 and otaupd.
7. pkill {the id in the output of the last command}
8. pkill {the other id in the output of the last command}
or instead of pkill, use reboot command to reboot the device. Then you will know if these two processes would be restarted after reboot.

The otav3 seems like "ota" "v3"; I am not sure if it has been changed to v4 recently.

Indeed you do not need to use ssh, if you have koreader, use the terminal simulator in the plugin can do pretty much the same thing.
阅读全文 »

其实这才应该是这一系列文章的第一节,因为这篇文章讲的是盘古开天地的事。话说Mr. Process是一个现代人,但是,只要是人,总该有个祖先。人们总想知道自己从哪来,然后才可以估摸算一下自己将去向何方。所以咱也要了解一下Linux的世界里人类的起源。
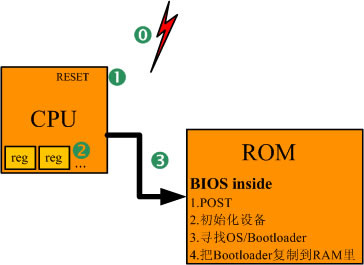
图1:从上电到BIOS

阅读全文 »

转自:http://manio.org/2010/01/08/scheduling-of-linux-view-of-society.html

Linux内核是一个无比复杂的系统,要想看清大致的脉络也非易事。其实,可以把运行中的Linux想像成一个人类的社会,当中的进程就是社会中的人。人有生老病死,进程有创建、异常、终止。人有各种各样的财产,进程有对应的地址空间、设备等等。人被各种各样的东西限制着,被人管着,进程也是。内核无比巨大,从哪着手?我想,从进程的视角来看是个好办法。并且,在学习Linux内核的同时,类比人类社会来看,会有更深刻的印象,理解得更透彻。

本来也应该从进程的创建开始写的,但是最近在看调度的相关论文,就又把Linux调度的东西看了一下。所以,就先写调度相关的东西吧。

阅读全文 »

IRC频道

有很多irc频道提供ebooks检索和推送.

python环境配置

一个系统多个python版本的管理,日常使用如何做到不污染系统python。

阅读全文 »

安装服务端(android)

1
2
3
4
5
6
7
8
9
10
11
12
13
14
15
安卓端:
https://github.com/frida/frida/releases
下载frida-server-x.y.z-android-x86.xz
# adb devices
# adb -s emulator-5554 push frida-server-14.2.18-android-x86 /data/
# adb kill-server && adb server && adb shell 进入android的shell运行frida-server

主机端:
https://github.com/hluwa/FRIDA-DEXDump
安装pip3 install frida-dexdump
到安卓运行app,然后执行如下命令导出dex
# frida-dexdump

frida-dexdump报错的话,用如下命令:
# frida -U -f {包名} -l dexDump.js --no-pause

概要

​ 仅需要实现软路由的朋友请移步《群晖官方套件VirtualDSM实现LEDE X64软路由》 ,有更简单的方法。下面主要讲的chroot环境下的折腾方法,一般作为学习用就可以了,同志们,折腾的过程是痛并快乐的,昨晚破天荒10点半睡觉,感觉整个人都活过来了。所以身体还是最重要的。
​ 在实现LEDE软路由过程中会发现网络无法访问问题,后来经过反复折腾,NAS硬重启N次后,发现chroot里设置的网络,一旦网线插拔变动,网络设置又会让群晖主系统更改,甚至导致群晖无法访问,需要长按关机才能恢复(今天得知其实可以通过群晖的pc端软件synology assistant来重制网络,我图样了)。

阅读全文 »

新建macvlan接口

1
2
3
4
5
6
7
8
9
10
#新建macvlan网络
docker network create -d macvlan -o parent=【eth0】 【eNet】 \
--subnet=【Network IP】 \
--ip-range=【IP Range】 \
--gateway=【Gateway IP】

例子:
docker network create -d macvlan -o parent=ovs_eth0 macnet --subnet=192.168.2.0/24 --ip-range=192.168.2.128/29 --gateway=192.168.2.1

docker run -d --name=qbittorrent --network macnet -e PUID=1026 -e PGID=100 -e TZ=Asia/Shanghai -e WEBUI_PORT=80 -v /volume1/docker/qbittorrent/config:/config -v /volume1/downloads:/downloads/vol1 -v /volume2/downloads2:/downloads/vol2 -v /volume4/media:/downloads/vol4 --restart unless-stopped linuxserver/qbittorrent:amd64-latest
阅读全文 »